Showing posts with label Fermentation. Show all posts

Friday, February 25, 2022

Fermentation: Make Your Own Sauerkraut!

If you are interested in making your own fermented foods and don't know where to start, sauerkraut is a great first project. It's very easy and requires only two ingredients: cabbage and salt. Here I will share with you how to make your very own sauerkraut!


Sauerkraut Recipe

Ingredients and materials
  • Cabbage, shredded (1 pound per pint jar)
  • Sea salt or Himalayan salt (2 teaspoons per pound of cabbage)
    • Please note: do not use iodized salt
  • Glass jars (for example, wide mouth 1-pint mason jars)

Directions
  1. Add the shredded cabbage and 2 teaspoons salt per pound of cabbage in a mixing bowl.
  2. Mix and knead the mixture until the cabbage releases its juices.
  3. Tightly pack the mixture into clean glass jars and leave at least an inch of headroom at the top.
  4. Cover the jar(s) loosely and place in an undisturbed, dark spot if possible.
  5. Press the sauerkraut down once a day, so that the liquid rises above the top of the kraut. 
  6. Let the cabbage ferment for 4-5 days, then taste the kraut. If you like the taste, store the sauerkraut in the fridge. Otherwise, continue to ferment for as long as you would like. The sauerkraut can be stored in the fridge for many months.
    • Tip: I usually like to ferment my sauerkraut for about a week, because the liquid in the sauerkraut tends to evaporate off over time, and the cabbage should be submerged in liquid during fermentation. But adjust the fermentation time depending on your personal preference, the environment, and your experience.
  7. Enjoy the sauerkraut when it's done!
Variations
  • Add Color: Try combinations of white and purple cabbage, or add some other root vegetables, such as carrots, beets, turnips, etc.
  • Add Spices: Caraway, anise, and fennel are all good candidates. Add 1 teaspoon per pound of cabbage, or more or less according to taste.
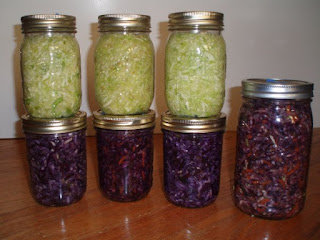
Sauerkraut made with green cabbage (top jars) and red cabbage, carrots, and caraway (jars below and to the right)

Fermented foods may provide health benefits, such as boosting the immune system, decreasing inflammation, and more.


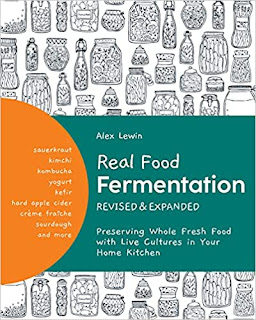
Looking for more fermentation projects? Check out the book Real Food Fermentation by Alex Lewin, which has just been released with a revised and expanded second edition. Learning how to make sauerkraut from Alex at a Slow Food BU workshop in 2009 was how I first got inspired to make it on my own at home! The book covers how to ferment foods and beverages of all kinds, with beautifully illustrated step by step photos. And if you enjoy the fermented tea kombucha, don't forget to read my contribution in the book with tips on the kombucha "mother," which is also known as a SCOBY, or symbiotic culture of bacteria and yeast.

Happy Fermenting!

Friday, May 30, 2014

A Visit to Vancouver

I had a great time visiting a college friend in Vancouver this past month. Here are some highlights from my trip!

The City of Vancouver is a major tourist destination, and it is very beautiful. Vancouver tends to have a mild climate year-round, with warm summer days, and a rainy winter season. The city is very walkable, and there are bike lanes everywhere. Driving and public transportation are other options to get around Vancouver. In addition, there are many parks all over the city.

Vancouver
Grocery prices in Vancouver are quite high, although I did make some interesting finds, including this marinated cabbage, primed for fermenting.

Marinated, sour cabbage
On my first full day in Vancouver, my friend and I visited Granville Island Public Market. You can get to Granville Island by walking, by public transportation, and by ferry. I enjoyed going to Granville Island Public Market, and I went there twice during my stay. The public market features homemade products and independent food vendors. I had a delicious focaccia from Terra Breads at the public market, and the best chocolate covered mocha beans I've ever had from Bon Mano Bon.

Granville Island Public Market
My friend showed my around Vancouver, and we visited several cultural landmarks, such as the Inukshuk.

Inukshuk
We also went to the International Summer Night Market in nearby Richmond, British Columbia, which was a blast!

International Summer Night Market
I found out that Lululemon stores offer complimentary yoga classes once a week, so that is what I did the following morning. For lunch, my friend and I had delicious lunch sets at Kingyo, which offers Japanese cuisine. We both ordered Kingyo's assorted deluxe bento box for lunch (limited to only 10 sets per day). It was amazing.

Kingyo's assorted deluxe bento box
After walking off some of our lunch, we decided to have gelato at Bella Gelateria, which has been voted to have some of the best gelato in the world. Mmmmmm.

Akbar mashti (rosewater, saffron, pistachio, and cream) and black sesame gelato
I also did some explorations of my own. This included renting a bike and biking around Stanley Park, and visiting the Vancouver Aquarium.

Anemones and rockfishes at the Vancouver Aquarium
I stopped by VanDusen Botanical Garden, which originally was a golf course before the site was transformed into a botanical garden and opened to the public in 1975.

VanDusen Botanical Garden
 There are many gorgeous flowers and plants at VanDusen Botanical Garden.


I visited the University of British Columbia (UBC) as well, which has a nice campus.

University of British Columbia
At the University of British Columbia, I went to the Beaty Biodiversity Museum, a natural history museum. At the Beaty Biodiversity Museum, I saw numerous preserved animals and skeletons, and I was lucky to catch the beginning of their Herbarium Project exhibition.

Rattlesnake skeleton
I also went to the Nitobe Memorial Garden at UBC, which is beautiful!

Nitobe Memorial Garden
For my last dinner before I left Vancouver, my friend and I ate at Nuba, which provides Lebanese cuisine.
One course of "La Feast," a vegetarian mezze sampler at Nuba
For dessert, we had donuts from Cartems Donuterie, including a Vegan Earl Grey donut and a Honey Parmesan donut. Yum!


I enjoyed seeing my friend and traveling to Vancouver. It was a relaxing visit, and Vancouver is a great city to explore and to eat delicious food!

Thursday, March 20, 2014

Amazaké: Fermenting Rice With a Rice Cooker

The fermentation adventures continue! It has been some time since I first fermented rice a few years ago. Since then, I have learned a few tricks of the trade. Although I have already written about fermenting rice, here I am going to share with you my latest tips and directions on how to make amazaké using a rice cooker.

Amazaké (also spelled amasake) literally means "sweet sake," although it does not contain alcohol. Amazaké is a sweet rice drink, made with rice that is fermented with koji. Koji is cultured grain inoculated with spores of Aspergillus oryzae, which is a fungus (a mold). Koji can be used to ferment other foods besides amazaké, including miso, sake, and rice vinegar. I purchased organic brown rice koji (and a few other goodies!) online from South River Miso, a local company based in Conway, MA.

Brown rice koji, miso tamari, and a miso sampler kit from South River Miso
The koji room at South River Miso, where koji is incubated. This photo was taken when I toured the company in 2012.
Besides being nutritious, amazaké is delicious, and fun and easy to make! Not sure if you like amazaké? You can find amazaké sold at Whole Foods Market if you would like to try it first.  

The Bridge Amasake sold at Whole Foods Market
Here are my latest directions on how to make amazaké using a rice cooker, inspired by South River Miso's amazaké recipe. As with all recipes, you will find different instructions for how to make amazaké if you look at other sources.

Amazaké recipe using a rice cooker

*Please note that this recipe may be scaled proportionally, to make as much or as little amazaké as you would like.

Ingredients and materials:
  • 1 cup brown rice
  • 1/2 cup brown rice koji
  • 4 cups water, divided (or more if desired)
  • Rice cooker
  • Thermometer (optional)

Directions:
  1. Cook the rice according to your rice cooker's instructions. I cook 1 cup brown rice with 2 cups of water. Do not add salt.
  2. After the rice is cooked, mix the rice. Add 1 cup of water to the rice and mix this in as well. Check the temperature of the rice. The temperature should be under 140°F. Give the rice time to cool down with the cover removed if necessary.
  3. When the rice has cooled down to under 140°F, mix in the koji.
    • Adding more koji to the ratio will make the amazaké sweeter.
    Brown rice with koji
  4. Keep the rice and koji mixture warm as it ferments. 
    • In the book "Wild Fermentation," Sandor Ellix Katz notes that the rice can ferment at temperatures in-between 90°F - 140°F. However, South River Miso recommends fermenting the rice in-between 115°F - 130°F. The higher the temperature, the faster the rice will ferment.
    • To keep the rice warm, I found it effective to prop the rice cooker cover on top of chopsticks, and to keep the rice cooker on the "keep warm" function. The temperature of the mixture was around 137°F with this method, and this worked out well for me. 
    • Ferment the rice for 5-8 hours or so.
      • If you are fermenting the rice at a lower temperature, you may also ferment the rice overnight or for up to 24 hours. The rice will get sweeter the longer it ferments.
    • It helps to occasionally mix the rice around every hour or so if possible. This helps to prevent the top layer from drying out.
    • During the fermentation process, enzymes secreted by Aspergillus oryzae break down some of the complex carbohydrates in the rice into simple sugars, which is how amazaké becomes sweet. As the rice ferments, it will begin to taste and smell sweet, and it may develop a liquid consistency.
      Keeping the ferment warm with the "keep warm" function
  5. When the rice tastes to your liking, add and mix in 1 cup water (or more if desired) to the fermented rice. Turn the rice cooker on the "cook" function for around 15 minutes, with the cover removed. Mix the rice constantly to prevent it from sticking to the bottom. Heating up the rice at a higher temperature with the "cook" function will stop the fermentation process, preventing the sugars from eventually turning into alcohol. 
    Fermented rice - amazaké
  6. Enjoy amazaké hot or cold. Amazaké can be stored in the refrigerator, and should keep for at least two weeks or more. My amazaké usually turns out thick like porridge. However, you will often see amazaké served as a beverage. If your amazaké is not thin enough to serve as a drink, water or any type of vegan "milk" can be added to it, and blended to create a drink. Amazaké can also be used as a sweetener substitute.

    Amazaké blended with almond milk and coconut milk
Amazaké with coconut milk, almonds, candied ginger, and cinnamon
Variations:
  • Try fermenting other grains with koji, such as millet.

Interested in fermentation beyond amazaké? Stay tuned to Boston Ferments if you live in the Boston area, and mark your calendars for the next Boston Fermentation Festival on September 27, 2014!

Wednesday, January 8, 2014

Fermenting Kimchi

After attending the Boston Fermentation Festival last September, I've had fermentation fever! Benefits of fermented foods abound. Fermented foods provide beneficial bacteria, preserve and sometimes enhance the nutrients in foods, and more.

Lately I have enjoyed making (and eating) kimchi. Kimchi is a traditional fermented Korean vegetable dish, often made with napa cabbage and red pepper. One great aspect about homemade kimchi is that you can make it exactly how you like it. Kimchi is also rather easy to make, once you get the hang of it. Here is the kimchi recipe that I have been using recently, from the book Real Food Fermentation by Alex Lewin. (A book that I contributed writing to!) This is an abbreviated version of Lewin's kimchi recipe, with my minor modifications. More details on making kimchi can be found in Real Food Fermentation.

The fermentation literature, and
Napa Trilogy Kimchi by Benjamin Green and Sean Kushi
(Photo courtesy of Sean Kushi)
Kimchi Recipe

Yield: Approximately 1 quart, or 2 pounds

Prep time: 10 minutes + overnight + 20 minutes

Total time: 5 days

Ingredients and equipment:
  • 1/3 cup coarse salt
  • 2 cups nonchlorinated water
  • 2 pounds vegetables: napa cabbage, plus optional mustard greens, bok choy, daikon, etc.
  • 1/2 head garlic
  • 1 large or 2 small onions
  • 1 piece (1/2 inch, or 13 mm) ginger root
  • Up to 1/2 cup Korean red pepper powder, chopped or ground red peppers, or pepper flakes
  • 1 tablespoon sugar
  • 1 teaspoon fish sauce (optional)
  • a few scallions or a length of Korean "long onion" (which is, more or less, a mature scallion)
  • 2 pint wide-mouth mason jars

Directions:
  1. In a mixing bowl, dissolve the salt in the water to make a brine.
  2. Cut up any or all of the 2 pounds of vegetables. Quarter the leafy bunches of vegetables, or cut them into 1-inch square pieces. Slice the cabbage core and include as much or as little as you like. Peel the root vegetables, and cut them into thin diagonal slices, 1 inch or so long. 
    Kimchi vegetables, ready to be brined
  3. Put the cut vegetables into the brine and mix, using clean hands. The brine makes the vegetables more malleable. Cover the bowl to keep it free of foreign objects. After 6 hours or so (or overnight), drain the vegetables thoroughly in a colander. Taste them. They should be salty, but not unpleasantly so. If they are unpleasantly salty, rinse them or soak them in fresh nonchlorinated water, taste them again, and repeat until you are satisfied. Set them aside. 
  4. Peel the garlic and the onions. Peel the ginger (the edge of a spoon works nicely).
  5. Blend the onions, garlic, and ginger in a food processor, adding enough water to allow them to blend. (Or mix them with a mortar and pestle, or chop them finely with a knife).
  6. Add the red pepper, sugar, and fish sauce, if using, to the combination from step 5, adding just enough water to keep things blending into a paste.  
  7. Making the red pepper paste
    (Photo courtesy of Sean Kushi)
  8. Cut the scallions diagonally into 1-inch lengths, add them to the paste, and mix the paste with a wooden spoon.
  9. Move the drained vegetables into a large bowl, and mix them with the seasoning paste using the spoon. Taste the kimchi. If it is not salty enough, add more salt now and stir. 
  10. Kimchi vegetables with the red pepper paste
  11. Pack the kimchi tightly into the Mason jars, leaving 1 inch of space at the top. Try to pack it down well enough to squeeze out most of the air bubbles along the side of the jar. Close the jar. 
  12. Leave the jar on the counter at room temperature for a few days. Taste it every day or two. It should start to taste a bit "wild." When you like the way it tastes, put it in a cool cellar or a refrigerator to store, or bury it in the ground. The cooler the temperature, the slower the subsequent fermentation.
My tips:
  • As a warning, kimchi is especially smelly as it ferments! You may want to ferment your kimchi in a cupboard if you have the space to.
  • The vegetables will shrink as they soak in the brine. I would not recommend adding more salt brine than what is listed in the recipe. Otherwise, the kimchi may turn out too salty.
  • Make the red pepper paste according to taste. For example, I do not like my red pepper paste too oniony, so I use less onion than called for in the recipe.
Enjoy kimchi with rice or noodles, or check out some of these kimchi serving suggestions from Serious Eats.

Happy fermenting!

Tastes of Summer Kimchi
Featuring vegetables from Waltham Fields Community Farm

Monday, October 1, 2012

Farm to Pharmacy Intensive

Last week, I participated in the Farm to Pharmacy Intensive with David Crow and William Siff at Goldthread Herb Farm. The farm is located in the foothills of the Berkshires of Western Massachusetts, and we were very lucky to have nice weather the majority of the time! Over the week, we learned about herbs in many different ways, including plant walks outdoors, harvesting, making various products with the herbs, and lectures. The concepts were taught incorporating Traditional Chinese Medicine and Ayurvedic principles.

Learning in the outdoor classroom with William Siff

The intensive went from Saturday, September 22 - Friday, September 28. With the exception of Friday and Saturday, class went from 9 am - 6 pm, with delicious vegetarian lunches catered by The Bakers Oven located in Shelburne Falls. The schedule varied each day, according to the weather.

A major focus of the program was how to apply herbalism at home. Therefore, we learned a lot about working with herbs that are relatively harmless, have a wide range of therapeutic benefits, are cost-effective, and are easy to grow in North America (if you are interested in growing your own herbs, check out The Medicinal Herb Grower by Richo Cech of Horizon Herbs). For example, applying herbalism can be as simple as using culinary herbs, which can have immense health benefits. This includes the oreganos, thymes, basils, sages, onions, garlic, and more.

Because the intensive was located at the herb farm, we were able to do some outdoor hands-on learning. At the end of September in Massachusetts, the growing season is coming to an end, so we harvested herbs and seeds, and we prepared plant beds for rest for the winter. We also garbled herbs, which is the process of separating the part of the plant that will be used from the parts that aren't wanted. For instance, removing the stems from dried peppermint leaves for storage purposes. Here is a nicely illustrated blog post describing how to easily garble herbs.

Wire mesh screen used for garbling herbs

We also learned about composting,

Vermicomposting in the greenhouse

and about many properties of the herbs that were present at the farm.

Ashwagandha, an important herb in Ayurvedic tradition and a strong restorative that strengthens the immune system

In addition, we learned about essential oils with David Crow from Floracopeia (the quality of the essential oils from Floracopeia is simply amazing).


On Thursday, we distilled local hemlock to make hydrosol and essential oil with Goldthread's distillery. This process involved stripping the hemlock needles,

 
Stripping hemlock needles

and placing the needles in a chamber in the 85-gallon still. With a fire and water, steam was created underneath, allowing the hot steam to pass upwards through the plant material, carrying the essential oil with it. The steam with the essential oil then went through a cold condensing unit, where the steam and essential oil recondensed. The liquid collected in a container, and because of the different densities, the oil separated from the water. The oil produced is the hemlock essential oil. After the essential oil is decanted off, the remaining aromatic liquid, which contains trace amounts of the essential oil, is known as a hydrosol. Hydrosols have numerous applications, such as for body care and as natural air fresheners.

Hemlock Distillation 

Hemlock essential oil (on top) and hydrosol (below)

While in Conway, I also explored the area, including a visit to the Ashfield Farmers Market nearby.

Ashfield Farmers Market

On Friday, I went on a tour of South River Miso, which is located right in Conway.

Miso is a seasoning often used to make miso soup in Japanese cuisine. However, it can be used in many other food preparations as well. As a fermented product, miso is reported to have numerous health benefits, such as cancer prevention, and in promoting health as a probiotic. At South River Miso, making miso involves cooking the beans, inoculating brown rice with spores of the mold Aspergillus oryzae to make koji, treading the beans by feet for an hour (wearing clean organic cotton socks, of course!), adding the rice koji, and then fermenting the miso in the wooden vats for 3 weeks, or even up to 3 years. This process produces not only miso, but also tamari, which is the liquid that collects in the vats of miso. Tamari is similar to soy sauce, but it has a lighter and sweeter taste. Check out these videos for a tour of South River Miso and to see how they make their products.

South River Miso's Fermentation Building. Tamari fermenting in the carboys (left) and miso fermenting in the vats (right).

South River Miso makes many varieties of miso, including traditional misos made with brown rice, and untraditional flavors, such as chickpea miso. I purchased some chickpea miso tamari and brown rice koji as a starter to make amazaké again. All of South River Miso's products can be ordered online from their website, and their miso can also be found at many Whole Foods markets.

It was a wonderful week away, and I learned a lot. Having already taken some herbalism and aromatherapy classes, I enjoyed learning from new teachers with different backgrounds, and also learning from a great group of peers. One major difference in this program compared to some of my previous classes was the emphasis on Ayurvedic principles and Traditional Chinese Medicine. If you are interested in other events offered by David Crow and William Siff, visit Floracopeia's website and Goldthread Herb Farm and Apothecary!

 Goldthread Herb Farm

Monday, August 27, 2012

A Summer at Waltham Fields Community Farm

This summer, I worked on the weed crew at Waltham Fields Community Farm.


Founded in 1995, Waltham Fields Community Farm is a nonprofit organization "engaged in food production, hunger relief, and education." The farm consists of 11 acres, it supports a 500-share CSA, and it offers various other programs. Some of the produce grown at the farm this season included kale,

Kale. Harvest from the bottom up, and it continues to grow and produce new leaves!

swiss chard,

Swiss chard was everywhere

a variety of flowers, and much more.

 
 Fresh flower bouquet

I saw okra growing for the first time, too!

 Okra flower

The weed crew position was part-time, Mondays - Fridays from 8 am - noon, from June - August. The crew consisted of four members, and from Tuesday - Friday we worked with drop-in volunteers, from 9 am - noon. It was great to meet and to work with volunteers of different ages and backgrounds! Most of the work that we did was by hand, and we occasionally used hand-tools. The weeding we did ranged from detailed work such as weeding carrots, to weeding weeds that were taller than me (I am five feet tall).

One great benefit of the job was receiving fresh produce from the farm. I fermented both pickling and salad cucumbers using the recipe from the book Real Food Fermentation (a book that I contributed writing to), and both batches of fermented pickles came out very crispy. I had grape leaves on hand to add to the fermenting jars as well, which are supposed to help pickled cucumbers to keep their crunch.

Fermenting cucumber pickles

Other ways I preserved the harvest included making sauerkraut and a variety of pestos, freezing, and canning tomatoes with other members of the weed crew. To make the tomato sauce, we modified a recipe from Pick Your Own, took the appropriate precautions in order to avoid botulism, and with three people, six hours of work, and a water bath canning set, we had canned 10 pint jars of tomato sauce.


 Cantaloupe ice cream

Despite Waltham Fields Community Farm's abundance of tomatoes this year, this has been a tough tomato year for some farms in the area because of late blight. Late blight appears sporadically in the northeast, and unfortunately returned this season. Also known as "Phytophthora infestans," late blight caused the Irish Potato Famine in the 1840s, and it infects tomatoes and potatoes. If late blight is not managed, it can destroy entire crops in days. While some farms in the area lost crops due to late blight, others who have been able to manage the disease have had a very productive tomato season. Read more about late blight in this handout, and for photos and for more information, visit this webpage.

Another crop we weeded was parsnips, a crop that we needed to weed in long pants, long sleeves, and gloves! Why? Because parsnips contain furocoumarins, a photosensitive compound that can cause phytophotodermatitis. If the plant juice from parsnips gets on your skin and the skin gets exposed to sunlight, it can cause serious burns and blisters that can last even up to a year. Although many people are already familiar with these burns from wild parsnips, the burns can occur with cultivated parsnips, as well. Luckily we were warned about the dangers of parsnip beforehand! For more information and pictures regarding parsnips burns, check out these articles: "Burned by wild parsnip," "Parsnips gave me blisters! Gardener covered in sores after brushing against vegetable leaves," and Parsnip Dangers from Wikipedia.

Over the summer, I also attended several meetings with Emasscraft, the Eastern Massachusetts Collaborative Regional Alliance for Farmer Training. "CRAFT is a free, collaborative group...From April through October farmers, farm workers and apprentices from CRAFT farms gather at one farm for a visit and/or workshop. Each visit includes an overview of the farm as well as a discussion about one or two specific topics. CRAFT discussions are also scheduled November through March if there is sufficient interest" (http://emasscraft.org/wordpress).

I went to three CRAFT meetings this season. At the meetings, I learned about weed management techniques at Drumlin Farm, tomatoes at Wright-Locke Farm (a farm that I also wrote an article about for the Lexington Farmers' Market), and irrigation systems at Moraine Farm. I enjoyed visiting new farms, and seeing how each farm operates differently from one another. The schedule for Emasscraft meetings can be found here, and I would highly recommend signing up for their listserv.

It was a great summer working on the weed crew, and also with the wonderful staff at the farm.

Waltham Fields Community Farm Staff of 2012 (minus Marla)
(photo courtesy of Waltham Fields Community Farm)

Although I am sad to no longer be working at Waltham Fields Community Farm, I am looking forward to sharing a winter CSA with some of my fellow weed crew members this winter. Waltham Fields Community Farm's annual Waltham Farm Day is also coming up on Saturday, September 22! For more information about Waltham Fields Community Farm, visit their website.


Red sunflower

I am also excited for some new opportunities that are coming up. I will be participating in Goldthread Herb Farm and Apothecary's Farm to Pharmacy Intensive this September 22-28. This week I also begin working at Blue Heron Organic Farm in Lincoln, and in addition to my waitressing hours at the Spanish wine and tapas restaurant Taberna de Haro, I will be working as a cook. Stop by the farm or the restaurant sometime and say hello!