Showing posts with label fermented foods. Show all posts

Friday, February 25, 2022

Fermentation: Make Your Own Sauerkraut!

If you are interested in making your own fermented foods and don't know where to start, sauerkraut is a great first project. It's very easy and requires only two ingredients: cabbage and salt. Here I will share with you how to make your very own sauerkraut!


Sauerkraut Recipe

Ingredients and materials
  • Cabbage, shredded (1 pound per pint jar)
  • Sea salt or Himalayan salt (2 teaspoons per pound of cabbage)
    • Please note: do not use iodized salt
  • Glass jars (for example, wide mouth 1-pint mason jars)

Directions
  1. Add the shredded cabbage and 2 teaspoons salt per pound of cabbage in a mixing bowl.
  2. Mix and knead the mixture until the cabbage releases its juices.
  3. Tightly pack the mixture into clean glass jars and leave at least an inch of headroom at the top.
  4. Cover the jar(s) loosely and place in an undisturbed, dark spot if possible.
  5. Press the sauerkraut down once a day, so that the liquid rises above the top of the kraut. 
  6. Let the cabbage ferment for 4-5 days, then taste the kraut. If you like the taste, store the sauerkraut in the fridge. Otherwise, continue to ferment for as long as you would like. The sauerkraut can be stored in the fridge for many months.
    • Tip: I usually like to ferment my sauerkraut for about a week, because the liquid in the sauerkraut tends to evaporate off over time, and the cabbage should be submerged in liquid during fermentation. But adjust the fermentation time depending on your personal preference, the environment, and your experience.
  7. Enjoy the sauerkraut when it's done!
Variations
  • Add Color: Try combinations of white and purple cabbage, or add some other root vegetables, such as carrots, beets, turnips, etc.
  • Add Spices: Caraway, anise, and fennel are all good candidates. Add 1 teaspoon per pound of cabbage, or more or less according to taste.
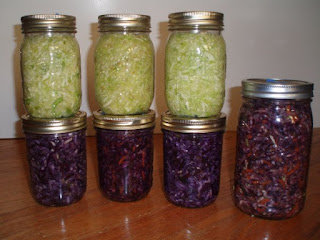
Sauerkraut made with green cabbage (top jars) and red cabbage, carrots, and caraway (jars below and to the right)

Fermented foods may provide health benefits, such as boosting the immune system, decreasing inflammation, and more.
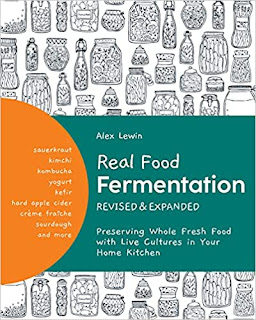

Looking for more fermentation projects? Check out the book Real Food Fermentation by Alex Lewin, which has just been released with a revised and expanded second edition. Learning how to make sauerkraut from Alex at a Slow Food BU workshop in 2009 was how I first got inspired to make it on my own at home! The book covers how to ferment foods and beverages of all kinds, with beautifully illustrated step by step photos. And if you enjoy the fermented tea kombucha, don't forget to read my contribution in the book with tips on the kombucha "mother," which is also known as a SCOBY, or symbiotic culture of bacteria and yeast.

Happy Fermenting!

Thursday, March 20, 2014

Amazaké: Fermenting Rice With a Rice Cooker

The fermentation adventures continue! It has been some time since I first fermented rice a few years ago. Since then, I have learned a few tricks of the trade. Although I have already written about fermenting rice, here I am going to share with you my latest tips and directions on how to make amazaké using a rice cooker.

Amazaké (also spelled amasake) literally means "sweet sake," although it does not contain alcohol. Amazaké is a sweet rice drink, made with rice that is fermented with koji. Koji is cultured grain inoculated with spores of Aspergillus oryzae, which is a fungus (a mold). Koji can be used to ferment other foods besides amazaké, including miso, sake, and rice vinegar. I purchased organic brown rice koji (and a few other goodies!) online from South River Miso, a local company based in Conway, MA.

Brown rice koji, miso tamari, and a miso sampler kit from South River Miso
The koji room at South River Miso, where koji is incubated. This photo was taken when I toured the company in 2012.
Besides being nutritious, amazaké is delicious, and fun and easy to make! Not sure if you like amazaké? You can find amazaké sold at Whole Foods Market if you would like to try it first.  

The Bridge Amasake sold at Whole Foods Market
Here are my latest directions on how to make amazaké using a rice cooker, inspired by South River Miso's amazaké recipe. As with all recipes, you will find different instructions for how to make amazaké if you look at other sources.

Amazaké recipe using a rice cooker

*Please note that this recipe may be scaled proportionally, to make as much or as little amazaké as you would like.

Ingredients and materials:
  • 1 cup brown rice
  • 1/2 cup brown rice koji
  • 4 cups water, divided (or more if desired)
  • Rice cooker
  • Thermometer (optional)

Directions:
  1. Cook the rice according to your rice cooker's instructions. I cook 1 cup brown rice with 2 cups of water. Do not add salt.
  2. After the rice is cooked, mix the rice. Add 1 cup of water to the rice and mix this in as well. Check the temperature of the rice. The temperature should be under 140°F. Give the rice time to cool down with the cover removed if necessary.
  3. When the rice has cooled down to under 140°F, mix in the koji.
    • Adding more koji to the ratio will make the amazaké sweeter.
    Brown rice with koji
  4. Keep the rice and koji mixture warm as it ferments. 
    • In the book "Wild Fermentation," Sandor Ellix Katz notes that the rice can ferment at temperatures in-between 90°F - 140°F. However, South River Miso recommends fermenting the rice in-between 115°F - 130°F. The higher the temperature, the faster the rice will ferment.
    • To keep the rice warm, I found it effective to prop the rice cooker cover on top of chopsticks, and to keep the rice cooker on the "keep warm" function. The temperature of the mixture was around 137°F with this method, and this worked out well for me. 
    • Ferment the rice for 5-8 hours or so.
      • If you are fermenting the rice at a lower temperature, you may also ferment the rice overnight or for up to 24 hours. The rice will get sweeter the longer it ferments.
    • It helps to occasionally mix the rice around every hour or so if possible. This helps to prevent the top layer from drying out.
    • During the fermentation process, enzymes secreted by Aspergillus oryzae break down some of the complex carbohydrates in the rice into simple sugars, which is how amazaké becomes sweet. As the rice ferments, it will begin to taste and smell sweet, and it may develop a liquid consistency.
      Keeping the ferment warm with the "keep warm" function
  5. When the rice tastes to your liking, add and mix in 1 cup water (or more if desired) to the fermented rice. Turn the rice cooker on the "cook" function for around 15 minutes, with the cover removed. Mix the rice constantly to prevent it from sticking to the bottom. Heating up the rice at a higher temperature with the "cook" function will stop the fermentation process, preventing the sugars from eventually turning into alcohol. 
    Fermented rice - amazaké
  6. Enjoy amazaké hot or cold. Amazaké can be stored in the refrigerator, and should keep for at least two weeks or more. My amazaké usually turns out thick like porridge. However, you will often see amazaké served as a beverage. If your amazaké is not thin enough to serve as a drink, water or any type of vegan "milk" can be added to it, and blended to create a drink. Amazaké can also be used as a sweetener substitute.

    Amazaké blended with almond milk and coconut milk
Amazaké with coconut milk, almonds, candied ginger, and cinnamon
Variations:
  • Try fermenting other grains with koji, such as millet.

Interested in fermentation beyond amazaké? Stay tuned to Boston Ferments if you live in the Boston area, and mark your calendars for the next Boston Fermentation Festival on September 27, 2014!

Wednesday, January 8, 2014

Fermenting Kimchi

After attending the Boston Fermentation Festival last September, I've had fermentation fever! Benefits of fermented foods abound. Fermented foods provide beneficial bacteria, preserve and sometimes enhance the nutrients in foods, and more.

Lately I have enjoyed making (and eating) kimchi. Kimchi is a traditional fermented Korean vegetable dish, often made with napa cabbage and red pepper. One great aspect about homemade kimchi is that you can make it exactly how you like it. Kimchi is also rather easy to make, once you get the hang of it. Here is the kimchi recipe that I have been using recently, from the book Real Food Fermentation by Alex Lewin. (A book that I contributed writing to!) This is an abbreviated version of Lewin's kimchi recipe, with my minor modifications. More details on making kimchi can be found in Real Food Fermentation.

The fermentation literature, and
Napa Trilogy Kimchi by Benjamin Green and Sean Kushi
(Photo courtesy of Sean Kushi)
Kimchi Recipe

Yield: Approximately 1 quart, or 2 pounds

Prep time: 10 minutes + overnight + 20 minutes

Total time: 5 days

Ingredients and equipment:
  • 1/3 cup coarse salt
  • 2 cups nonchlorinated water
  • 2 pounds vegetables: napa cabbage, plus optional mustard greens, bok choy, daikon, etc.
  • 1/2 head garlic
  • 1 large or 2 small onions
  • 1 piece (1/2 inch, or 13 mm) ginger root
  • Up to 1/2 cup Korean red pepper powder, chopped or ground red peppers, or pepper flakes
  • 1 tablespoon sugar
  • 1 teaspoon fish sauce (optional)
  • a few scallions or a length of Korean "long onion" (which is, more or less, a mature scallion)
  • 2 pint wide-mouth mason jars

Directions:
  1. In a mixing bowl, dissolve the salt in the water to make a brine.
  2. Cut up any or all of the 2 pounds of vegetables. Quarter the leafy bunches of vegetables, or cut them into 1-inch square pieces. Slice the cabbage core and include as much or as little as you like. Peel the root vegetables, and cut them into thin diagonal slices, 1 inch or so long. 
    Kimchi vegetables, ready to be brined
  3. Put the cut vegetables into the brine and mix, using clean hands. The brine makes the vegetables more malleable. Cover the bowl to keep it free of foreign objects. After 6 hours or so (or overnight), drain the vegetables thoroughly in a colander. Taste them. They should be salty, but not unpleasantly so. If they are unpleasantly salty, rinse them or soak them in fresh nonchlorinated water, taste them again, and repeat until you are satisfied. Set them aside. 
  4. Peel the garlic and the onions. Peel the ginger (the edge of a spoon works nicely).
  5. Blend the onions, garlic, and ginger in a food processor, adding enough water to allow them to blend. (Or mix them with a mortar and pestle, or chop them finely with a knife).
  6. Add the red pepper, sugar, and fish sauce, if using, to the combination from step 5, adding just enough water to keep things blending into a paste.  
  7. Making the red pepper paste
    (Photo courtesy of Sean Kushi)
  8. Cut the scallions diagonally into 1-inch lengths, add them to the paste, and mix the paste with a wooden spoon.
  9. Move the drained vegetables into a large bowl, and mix them with the seasoning paste using the spoon. Taste the kimchi. If it is not salty enough, add more salt now and stir. 
  10. Kimchi vegetables with the red pepper paste
  11. Pack the kimchi tightly into the Mason jars, leaving 1 inch of space at the top. Try to pack it down well enough to squeeze out most of the air bubbles along the side of the jar. Close the jar. 
  12. Leave the jar on the counter at room temperature for a few days. Taste it every day or two. It should start to taste a bit "wild." When you like the way it tastes, put it in a cool cellar or a refrigerator to store, or bury it in the ground. The cooler the temperature, the slower the subsequent fermentation.
My tips:
  • As a warning, kimchi is especially smelly as it ferments! You may want to ferment your kimchi in a cupboard if you have the space to.
  • The vegetables will shrink as they soak in the brine. I would not recommend adding more salt brine than what is listed in the recipe. Otherwise, the kimchi may turn out too salty.
  • Make the red pepper paste according to taste. For example, I do not like my red pepper paste too oniony, so I use less onion than called for in the recipe.
Enjoy kimchi with rice or noodles, or check out some of these kimchi serving suggestions from Serious Eats.

Happy fermenting!

Tastes of Summer Kimchi
Featuring vegetables from Waltham Fields Community Farm

Monday, October 1, 2012

Farm to Pharmacy Intensive

Last week, I participated in the Farm to Pharmacy Intensive with David Crow and William Siff at Goldthread Herb Farm. The farm is located in the foothills of the Berkshires of Western Massachusetts, and we were very lucky to have nice weather the majority of the time! Over the week, we learned about herbs in many different ways, including plant walks outdoors, harvesting, making various products with the herbs, and lectures. The concepts were taught incorporating Traditional Chinese Medicine and Ayurvedic principles.

Learning in the outdoor classroom with William Siff

The intensive went from Saturday, September 22 - Friday, September 28. With the exception of Friday and Saturday, class went from 9 am - 6 pm, with delicious vegetarian lunches catered by The Bakers Oven located in Shelburne Falls. The schedule varied each day, according to the weather.

A major focus of the program was how to apply herbalism at home. Therefore, we learned a lot about working with herbs that are relatively harmless, have a wide range of therapeutic benefits, are cost-effective, and are easy to grow in North America (if you are interested in growing your own herbs, check out The Medicinal Herb Grower by Richo Cech of Horizon Herbs). For example, applying herbalism can be as simple as using culinary herbs, which can have immense health benefits. This includes the oreganos, thymes, basils, sages, onions, garlic, and more.

Because the intensive was located at the herb farm, we were able to do some outdoor hands-on learning. At the end of September in Massachusetts, the growing season is coming to an end, so we harvested herbs and seeds, and we prepared plant beds for rest for the winter. We also garbled herbs, which is the process of separating the part of the plant that will be used from the parts that aren't wanted. For instance, removing the stems from dried peppermint leaves for storage purposes. Here is a nicely illustrated blog post describing how to easily garble herbs.

Wire mesh screen used for garbling herbs

We also learned about composting,

Vermicomposting in the greenhouse

and about many properties of the herbs that were present at the farm.

Ashwagandha, an important herb in Ayurvedic tradition and a strong restorative that strengthens the immune system

In addition, we learned about essential oils with David Crow from Floracopeia (the quality of the essential oils from Floracopeia is simply amazing).


On Thursday, we distilled local hemlock to make hydrosol and essential oil with Goldthread's distillery. This process involved stripping the hemlock needles,

 
Stripping hemlock needles

and placing the needles in a chamber in the 85-gallon still. With a fire and water, steam was created underneath, allowing the hot steam to pass upwards through the plant material, carrying the essential oil with it. The steam with the essential oil then went through a cold condensing unit, where the steam and essential oil recondensed. The liquid collected in a container, and because of the different densities, the oil separated from the water. The oil produced is the hemlock essential oil. After the essential oil is decanted off, the remaining aromatic liquid, which contains trace amounts of the essential oil, is known as a hydrosol. Hydrosols have numerous applications, such as for body care and as natural air fresheners.

Hemlock Distillation 

Hemlock essential oil (on top) and hydrosol (below)

While in Conway, I also explored the area, including a visit to the Ashfield Farmers Market nearby.

Ashfield Farmers Market

On Friday, I went on a tour of South River Miso, which is located right in Conway.

Miso is a seasoning often used to make miso soup in Japanese cuisine. However, it can be used in many other food preparations as well. As a fermented product, miso is reported to have numerous health benefits, such as cancer prevention, and in promoting health as a probiotic. At South River Miso, making miso involves cooking the beans, inoculating brown rice with spores of the mold Aspergillus oryzae to make koji, treading the beans by feet for an hour (wearing clean organic cotton socks, of course!), adding the rice koji, and then fermenting the miso in the wooden vats for 3 weeks, or even up to 3 years. This process produces not only miso, but also tamari, which is the liquid that collects in the vats of miso. Tamari is similar to soy sauce, but it has a lighter and sweeter taste. Check out these videos for a tour of South River Miso and to see how they make their products.

South River Miso's Fermentation Building. Tamari fermenting in the carboys (left) and miso fermenting in the vats (right).

South River Miso makes many varieties of miso, including traditional misos made with brown rice, and untraditional flavors, such as chickpea miso. I purchased some chickpea miso tamari and brown rice koji as a starter to make amazaké again. All of South River Miso's products can be ordered online from their website, and their miso can also be found at many Whole Foods markets.

It was a wonderful week away, and I learned a lot. Having already taken some herbalism and aromatherapy classes, I enjoyed learning from new teachers with different backgrounds, and also learning from a great group of peers. One major difference in this program compared to some of my previous classes was the emphasis on Ayurvedic principles and Traditional Chinese Medicine. If you are interested in other events offered by David Crow and William Siff, visit Floracopeia's website and Goldthread Herb Farm and Apothecary!

 Goldthread Herb Farm

Monday, August 27, 2012

A Summer at Waltham Fields Community Farm

This summer, I worked on the weed crew at Waltham Fields Community Farm.


Founded in 1995, Waltham Fields Community Farm is a nonprofit organization "engaged in food production, hunger relief, and education." The farm consists of 11 acres, it supports a 500-share CSA, and it offers various other programs. Some of the produce grown at the farm this season included kale,

Kale. Harvest from the bottom up, and it continues to grow and produce new leaves!

swiss chard,

Swiss chard was everywhere

a variety of flowers, and much more.

 
 Fresh flower bouquet

I saw okra growing for the first time, too!

 Okra flower

The weed crew position was part-time, Mondays - Fridays from 8 am - noon, from June - August. The crew consisted of four members, and from Tuesday - Friday we worked with drop-in volunteers, from 9 am - noon. It was great to meet and to work with volunteers of different ages and backgrounds! Most of the work that we did was by hand, and we occasionally used hand-tools. The weeding we did ranged from detailed work such as weeding carrots, to weeding weeds that were taller than me (I am five feet tall).

One great benefit of the job was receiving fresh produce from the farm. I fermented both pickling and salad cucumbers using the recipe from the book Real Food Fermentation (a book that I contributed writing to), and both batches of fermented pickles came out very crispy. I had grape leaves on hand to add to the fermenting jars as well, which are supposed to help pickled cucumbers to keep their crunch.

Fermenting cucumber pickles

Other ways I preserved the harvest included making sauerkraut and a variety of pestos, freezing, and canning tomatoes with other members of the weed crew. To make the tomato sauce, we modified a recipe from Pick Your Own, took the appropriate precautions in order to avoid botulism, and with three people, six hours of work, and a water bath canning set, we had canned 10 pint jars of tomato sauce.


 Cantaloupe ice cream

Despite Waltham Fields Community Farm's abundance of tomatoes this year, this has been a tough tomato year for some farms in the area because of late blight. Late blight appears sporadically in the northeast, and unfortunately returned this season. Also known as "Phytophthora infestans," late blight caused the Irish Potato Famine in the 1840s, and it infects tomatoes and potatoes. If late blight is not managed, it can destroy entire crops in days. While some farms in the area lost crops due to late blight, others who have been able to manage the disease have had a very productive tomato season. Read more about late blight in this handout, and for photos and for more information, visit this webpage.

Another crop we weeded was parsnips, a crop that we needed to weed in long pants, long sleeves, and gloves! Why? Because parsnips contain furocoumarins, a photosensitive compound that can cause phytophotodermatitis. If the plant juice from parsnips gets on your skin and the skin gets exposed to sunlight, it can cause serious burns and blisters that can last even up to a year. Although many people are already familiar with these burns from wild parsnips, the burns can occur with cultivated parsnips, as well. Luckily we were warned about the dangers of parsnip beforehand! For more information and pictures regarding parsnips burns, check out these articles: "Burned by wild parsnip," "Parsnips gave me blisters! Gardener covered in sores after brushing against vegetable leaves," and Parsnip Dangers from Wikipedia.

Over the summer, I also attended several meetings with Emasscraft, the Eastern Massachusetts Collaborative Regional Alliance for Farmer Training. "CRAFT is a free, collaborative group...From April through October farmers, farm workers and apprentices from CRAFT farms gather at one farm for a visit and/or workshop. Each visit includes an overview of the farm as well as a discussion about one or two specific topics. CRAFT discussions are also scheduled November through March if there is sufficient interest" (http://emasscraft.org/wordpress).

I went to three CRAFT meetings this season. At the meetings, I learned about weed management techniques at Drumlin Farm, tomatoes at Wright-Locke Farm (a farm that I also wrote an article about for the Lexington Farmers' Market), and irrigation systems at Moraine Farm. I enjoyed visiting new farms, and seeing how each farm operates differently from one another. The schedule for Emasscraft meetings can be found here, and I would highly recommend signing up for their listserv.

It was a great summer working on the weed crew, and also with the wonderful staff at the farm.

Waltham Fields Community Farm Staff of 2012 (minus Marla)
(photo courtesy of Waltham Fields Community Farm)

Although I am sad to no longer be working at Waltham Fields Community Farm, I am looking forward to sharing a winter CSA with some of my fellow weed crew members this winter. Waltham Fields Community Farm's annual Waltham Farm Day is also coming up on Saturday, September 22! For more information about Waltham Fields Community Farm, visit their website.


Red sunflower

I am also excited for some new opportunities that are coming up. I will be participating in Goldthread Herb Farm and Apothecary's Farm to Pharmacy Intensive this September 22-28. This week I also begin working at Blue Heron Organic Farm in Lincoln, and in addition to my waitressing hours at the Spanish wine and tapas restaurant Taberna de Haro, I will be working as a cook. Stop by the farm or the restaurant sometime and say hello!

Thursday, June 30, 2011

Fermenting Rice: Amazaké

Ever since I first tried the fermented rice drink, amazaké, from Whole Foods, I've been intrigued at how to make it. It was hard to believe that such a sweet beverage could be made only with rice and a fermentation starter, without any added sweetener! Although amazaké literally means "sweet sake," it contains almost no alcohol because the fermentation process is stopped with the addition of heat. (Or if the fermentation process isn't stopped, then making amazaké can be the first step to making sake, the Japanese rice wine). Amazaké can be made with grains and koji, or it can be made with sake lees, which are byproducts from the sake making process. Like many other fermented foods, amazaké is thought to be very nutritious. For example, it is said to contain B vitamins. And because I love fermentation, I thought that making amazaké would be a great culinary endeavor!

Here, I am providing a brief recap of the recipe to make amazaké (a combination of the recipe listed in Sandor Katz's book, Wild Fermentation (1), and South River Miso's Amazaké recipe). For a more detailed set of directions, check out South River Miso's Amazaké recipe.

Ingredients:
-Water
-2 cups grain (I used brown rice, but other grains may be substituted, such as millet)
-2 cups koji (I ordered my koji locally from South River Miso. The koji is the fermentation starter, and here it's brown rice inoculated with the spores of the mold Aspergillus oryzae)


Directions

1. Cook the grain in 6 cups of water. Please note: do not add salt when cooking the grain.

2. When the grain is finished cooking, remove from heat, uncover the pot, and allow the grain to cool down to about 110-130° F. Don't let the grain get too cool- koji can tolerate temperatures as high as 140° F.

3. Add the koji to the cooked grain and stir well.


Brown rice with koji mixed in

4. Keep the container in a warm place for about 5-8 hours or overnight (at least 90° F or above). The amount of time you ferment the mixture will depend on the desired level of sweetness and the temperature. The higher the temperature, the quicker the fermentation process will take place. Do not let the grain get above 140° F, which can kill the koji. Suggestions for incubation: a rice cooker on keep warm, with a towel on top instead of the hard cover. Or incubate in the oven with a pilot light, in a hot water bath, etc.).


Amazaké after about 5 hours

5. When the amazaké is at your desired level of sweetness, gently boil it with some additional water or heat it up to stop the fermentation process (which will prevent the amazaké from turning into alcohol). Be careful not to burn the amazaké.

6. Amazaké can be stored for several weeks in the refrigerator. Serve the amazaké as is as a pudding, or add water to it and put it in a blender to made a sweet rice drink. You can also seasonings to it, such as honey or spices. Amazaké can also be used as a sweet base for various preparations, such as breads and baked goods. Read more suggestions for what to do with amazaké here.

My amazaké didn't turn out as watery as I thought it would be, so I ended up making sweet rice balls with my amazaké:


Amazaké rice balls, covered with black and white sesame seeds, coconut flakes, and sea salt, with a peanut in the center.

Two comments from my experience:
-I tried freezing some of the rice balls, but they did not taste very good after being kept in the freezer.
-I used a slow cooker to incubate and ferment the amazaké. However, from a quick google search, it seems that slow cooker temperatures, even on low, can reach temperatures to above 140° F. This meant that I was constantly monitoring the amazaké to try and ensure that it didn't get above 140° F (I didn't have a food thermometer, so I was estimating). So, ferment amazaké in a slow cooker at your own risk...

Amazaké is a fun and different way to enjoy your grains. In addition, amazaké is a great way to have a sweet snack that is also healthy, without any additional sugar added.

If you are interested in trying amazaké before you attempt to make it, I have found amazaké at various Whole Foods Markets and at the Harvest Co-Op. At the Harvest Co-Op, I've also found amazaké in various delicious flavors, such as Almond Shake and Go Hazelnuts. You may also find amazaké in your local Asian grocery store. If you have any stories about your experience with amazaké, please share!

Source:
1. Katz, Sandor Ellix. Wild Fermentation. White River Junction, Vermont: Chelsea Green Publishing Company, 2003, p. 118-119.

Monday, April 11, 2011

Living Foods Lifestyle Program: Day 1

Today was my first day at the Ann Wigmore Natural Health Institute for their Living Foods Lifestyle Certification Program: 2 weeks of eating, learning, and immersing in a vegan, raw, and living foods lifestyle in sunny Puerto Rico.

But before I get into the program, I'd like to backtrack into how I got there:

The plane ride to Puerto Rico was not the best. A delay in one of my flights meant that I missed a connecting flight, so alas I had to stay an extra day in New York City. The upside was that in my NYC I was able to visit One Lucky Duck, which offers raw foods and juices, and Candle Cafe, which offers vegan and farm fresh food options. The sushi at One Lucky Duck was delicious, filled with marinated shiitake, avocado, asparagus, red pepper, jicama rice, and nama shoyu. However, their chocolate garnache tart, although good, was extremely dense and something that you will want to share with many friends. At Candle Cafe, I loved the BBQ Tempeh and Sweet Potato sandwich served with a side salad and an amazing shallot sage aioli. Their vegan and gluten-free oatmeal and chocolate chip cookie was on the slightly dry and crumbly side (probably due to the spelt flour), but it was good considering that it can be hard to make a good gluten-free cookie.

After rescheduling my flight and after an 8 hour layover at the Fort Lauderdale airport in Florida, I was happy to finally arrive at the Ann Wigmore Natural Health Institute at 3 am this morning.


please note that these pictures were not taken at 3 am

I have to say that I cannot complain about the surroundings.

The beach next to the institute

A few hours after my arrival, I woke up tired but enthusiastic for my 7:30 am class on juicing wheatgrass. After our class on wheatgrass, we went into the dining room for breakfast. Today's breakfast options were a fresh papaya and banana salad with sprouted buckwheat grains, or energy soup, made with blended green vegetables and sprouts, and that could be topped with various toppings such as pureed ginger and dulse flakes. Breakfast at the institute is the one meal that is always silent, allowing individuals to focus on the meal and to concentrate on chewing, a part that can be often forgotten about in eating: chewing is the first step in the digestive process, allowing the enzyme salivary amylase in our saliva to begin breaking down the food in our mouths as we chew.

After breakfast we had a two hour class learning more about Dr. Ann Wigmore and the institute, which was broken up by a 15 minute snack. Then we had lunch, optional yoga at 2:45 pm daily (there is also yoga daily at 6:15 am), another snack, and then class again at 4:15 where we learned about enemas and implants. Dinner is regularly at 6 pm, and after dinner there is typically a class at 7 pm. Classes are on weekdays, and weekends we get off.

Dinner, featuring energy soup, papaya, sunflower seed yogurt, dehydrated flax seed crackers, and various toppings

If eating raw foods is something that you are new to, it definitely takes some getting used to. Even though raw foods has always been an interest of mine in reading, culinary adventures, and dining out, going completely raw and vegan in my diet is not the same as reading about and dabbling in it.

Rejuvelac, a fermented beverage, is always on hand. Pictured here is rejuvelac made from cabbage (left) and quinoa (right). The cabbage rejuvelac is basically like drinking sauerkraut juice.

Two daily activities that I know that I'll need some getting used to are juicing and drinking wheatgrass regularly twice a day (the wheatgrass flavor is strong) and the enemas and implants (enema: clearing the colon, such as with filtered water, and implant: here we implant the colon with wheatgrass juice for cleansing and detoxification. Read more about enemas and implants here). Of course, you only do what you are comfortable with in the program, and it's important to listen to your body. Another challenge that will be coming up very soon (tomorrow) will eating only blended foods for the next three days!

These next two weeks will be an experience featuring different and new food and lifestyle challenges. I am interested to see how my body will adjust to these changes, and also how my diet and lifestyle will change after I return from this trip. Overall, I'm glad to be here, I'm sure that this will be a worthwhile and learning experience, and I'm looking forward to what the next two weeks will bring!

Friday, July 31, 2009

Get Your Ferment On - Fermented Veggies, Food Preservation, & Live Active Cultures!

Today's post is dedicated to the wonderful world of fermented veggies.

To start off, here are a few definitions to clear up some initial confusion:
  • Lacto fermentation- "using salt to suppress spoiling bacteria while fostering growth of beneficial lacto bacillus bacteria, which are present on vegetables and produce the preservative lactic acid." (1)
  • Pickling- "Using vinegar to preserve vegetables or fruits along with spices and herbs."
  • Hot water bath canning- "using a boiling pot of water to push air out of sealing-lid glass jars containing high acid foods." (1)
  • Pressure canning- "Using a pressurized canner to create even higher temperatures (steam) that pushes out air and seals the lid of glass jars containing low acid foods." (1)
  • Culturing- "Using microorganisms to transform the sugars or lactose of various liquid foods into other kinds of nutritious and tasty substances." (1)
Vegetables usually ferment best when using a brine, which is basically salt dissolved in water (2, pg. 38). In some vegetable ferments, such as sauerkraut (aka fermented cabbage), the salt draws water out the vegetables via osmosis (2, pg. 38). Meanwhile, in other vegetable ferments, such as cucumber pickles, a brine solution is mixed separately and then poured on the vegetables (2, pg 38). The salty environment prevents strains of several harmful and pathogenic bacteria from growing, while it encourages the growth of certain desired strains of bacteria- in particular, Lactobacilli (2, pg. 38-39).

In addition, the more salt you use (2, pg. 39):
  • The slower the fermentation process
  • The more acidic/sour the product
  • The longer the product will store for
Fermentation vessels include crocks or simply large, glass wide-mouth jars. A smaller glass jar can be placed inside a wide-mouth jar to put pressure and weight on the fermenting vegetables.

And fermenting vegetables can be as simple as this:
  • Make a brine by dissolving ~3 tbsp salt in 4 cups water (or to taste)
  • Put 1.5-2 lbs of cut up vegetables (for ex., cabbage, carrots, beans, squash, radish root vegetables, a combination, etc.) into crock(s) or jar(s). This can be done with or without the addition of spices or herbs (for ex., whole peppercorns, mustard seed, caraway, dill, etc.)
  • Pour the saltwater brine over the vegetables, making sure that the vegetables are submerged in the liquid.
  • Put a plate or weight on top of the vegetables to weigh the veggies down.
  • Put a cloth or towel over the container, and let sit at room temperature for 2-4 days (to taste)
  • When the vegetables are ready, store in the fridge

Helpful hints:

  • It is important to make sure that the vegetables remain submerged, because fermentation is an anaerobic (without oxygen) process. If there are vegetables above the liquid, they will be exposed to oxygen, and can encourage the growth of mold.
  • Try to remember to check on your fermented veggies everyday and make sure that they are submerged under the brine, and also taste them to see if they are ready for refrigeration. If there are any moldy veggies on top, you can just remove them (the mold only grows on the surface). And if there is water loss by evaporation, simply add more brine to your fermenting vegetables.
  • Fermentation occurs more quickly at higher temperatures.

By making your own fermented vegetables, (including sauerkraut, sour beets, kimchi, and more), you can control the saltiness and sourness/acidity of your fermented food!

In addition, there are many benefits of fermentation and from eating fermented foods:
  • Fermentation preserves nutrients, and "breaks them down into more easily digestible forms" (2, pg. 6)
  • Fermentation creates new nutrients, such as B vitamins (ie. folic acid, riboflavin niacin, thiamin, and biotin) (2, pg. 6)
  • Fermentation "removes toxins from foods" (2, pg. 7)
  • "Many fermented foods can be consumed live...and alive is the most nutritious way to eat them" (2, pg. 7)
  • "Many commercially available fermented foods are pasteurized," such as commercially sold yogurt in stores, "which means [that they are] heated to the point at which [beneficicial and nonbeneficial] microorganisms die." (2, pg. 8)
  • "Lactobacillus fermentation inhibits the growth of diarrhea-related bacteria such as Shigella, Salmonella, and E. coli." (2, pg. 8)
  • Fermentation is another way to preserve foods.
After you've done it once, you'll find that fermenting vegetables is actually very easy! Look at my sample recipe above or links to some recipes below.

For more information on fermentation from Sandor Ellix Katz, read his book Wild Fermentation, or take a look at his website for recipes on how to make sauerkraut, pickles, and more!

In addition, Gabriel Cousens from the Tree of Life Rejuvination Center provides a little information on fermented foods in his book Conscious Eating. Preview Conscious Eating here through Google Books, and go to page 743 to read the section on Fermented Vegetables and also to find a few recipes.

In his book, Gabriel Cousens notes:

  • "Sauerkrauts are fermented foods that help re-populate the colon with health-promoting, lactic acid-producing bacteria. Raw sauerkraut has these healthy bacteria, but store-bought, pasteurized sauerkraut does not." (3, pg. 743)

And although I already went through some definitions, I would like to reiterate that room temperature vegetable ferments are not the same as pickled vegetables made and stored in vinegar (when you put the vegetables directly in the fridge for preservation/to develop flavor). Although both are food preservation methods, vegetables fermented at room or warm temperatures for several days or weeks rely on the bacteria lactobacilli to create lactic acid. Thus, these fermented vegetables contain live active cultures. Read a little more info on this subject here.

If you would like some more reading on sauerkraut fermentation, look no further.

And on another note, the other day I was at the Russian grocery store Bazaar in Brookline, and I tried a pickled apple! I probably won't be getting one again, but it wasn't bad! (It was sweet and sour at the same time!)

Happy Friday everyone! :)

Sources:

  1. Ben Grosscup. "9-19-09: Date of Food Preservation Workshop Near You." NOFA - Massachusetts News - August-October 2009, p. 4.
  2. Katz, Sandor Ellix. Wild Fermentation. White River Junction, Vermont: Chelsea Green Publishing Company, 2003.
  3. Cousens, Gabriel. Conscious Eating. Berkeley, California: North Atlantic Books, 2000.