Showing posts with label food preservation. Show all posts

Friday, February 25, 2022

Fermentation: Make Your Own Sauerkraut!

If you are interested in making your own fermented foods and don't know where to start, sauerkraut is a great first project. It's very easy and requires only two ingredients: cabbage and salt. Here I will share with you how to make your very own sauerkraut!


Sauerkraut Recipe

Ingredients and materials
  • Cabbage, shredded (1 pound per pint jar)
  • Sea salt or Himalayan salt (2 teaspoons per pound of cabbage)
    • Please note: do not use iodized salt
  • Glass jars (for example, wide mouth 1-pint mason jars)

Directions
  1. Add the shredded cabbage and 2 teaspoons salt per pound of cabbage in a mixing bowl.
  2. Mix and knead the mixture until the cabbage releases its juices.
  3. Tightly pack the mixture into clean glass jars and leave at least an inch of headroom at the top.
  4. Cover the jar(s) loosely and place in an undisturbed, dark spot if possible.
  5. Press the sauerkraut down once a day, so that the liquid rises above the top of the kraut. 
  6. Let the cabbage ferment for 4-5 days, then taste the kraut. If you like the taste, store the sauerkraut in the fridge. Otherwise, continue to ferment for as long as you would like. The sauerkraut can be stored in the fridge for many months.
    • Tip: I usually like to ferment my sauerkraut for about a week, because the liquid in the sauerkraut tends to evaporate off over time, and the cabbage should be submerged in liquid during fermentation. But adjust the fermentation time depending on your personal preference, the environment, and your experience.
  7. Enjoy the sauerkraut when it's done!
Variations
  • Add Color: Try combinations of white and purple cabbage, or add some other root vegetables, such as carrots, beets, turnips, etc.
  • Add Spices: Caraway, anise, and fennel are all good candidates. Add 1 teaspoon per pound of cabbage, or more or less according to taste.
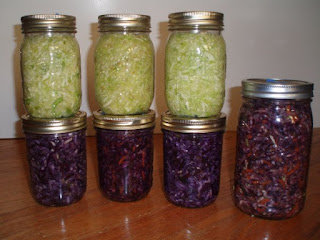
Sauerkraut made with green cabbage (top jars) and red cabbage, carrots, and caraway (jars below and to the right)

Fermented foods may provide health benefits, such as boosting the immune system, decreasing inflammation, and more.


Looking for more fermentation projects? Check out the book Real Food Fermentation by Alex Lewin, which has just been released with a revised and expanded second edition. Learning how to make sauerkraut from Alex at a Slow Food BU workshop in 2009 was how I first got inspired to make it on my own at home! The book covers how to ferment foods and beverages of all kinds, with beautifully illustrated step by step photos. And if you enjoy the fermented tea kombucha, don't forget to read my contribution in the book with tips on the kombucha "mother," which is also known as a SCOBY, or symbiotic culture of bacteria and yeast.

Happy Fermenting!

Wednesday, January 8, 2014

Fermenting Kimchi

After attending the Boston Fermentation Festival last September, I've had fermentation fever! Benefits of fermented foods abound. Fermented foods provide beneficial bacteria, preserve and sometimes enhance the nutrients in foods, and more.

Lately I have enjoyed making (and eating) kimchi. Kimchi is a traditional fermented Korean vegetable dish, often made with napa cabbage and red pepper. One great aspect about homemade kimchi is that you can make it exactly how you like it. Kimchi is also rather easy to make, once you get the hang of it. Here is the kimchi recipe that I have been using recently, from the book Real Food Fermentation by Alex Lewin. (A book that I contributed writing to!) This is an abbreviated version of Lewin's kimchi recipe, with my minor modifications. More details on making kimchi can be found in Real Food Fermentation.

The fermentation literature, and
Napa Trilogy Kimchi by Benjamin Green and Sean Kushi
(Photo courtesy of Sean Kushi)
Kimchi Recipe

Yield: Approximately 1 quart, or 2 pounds

Prep time: 10 minutes + overnight + 20 minutes

Total time: 5 days

Ingredients and equipment:
  • 1/3 cup coarse salt
  • 2 cups nonchlorinated water
  • 2 pounds vegetables: napa cabbage, plus optional mustard greens, bok choy, daikon, etc.
  • 1/2 head garlic
  • 1 large or 2 small onions
  • 1 piece (1/2 inch, or 13 mm) ginger root
  • Up to 1/2 cup Korean red pepper powder, chopped or ground red peppers, or pepper flakes
  • 1 tablespoon sugar
  • 1 teaspoon fish sauce (optional)
  • a few scallions or a length of Korean "long onion" (which is, more or less, a mature scallion)
  • 2 pint wide-mouth mason jars

Directions:
  1. In a mixing bowl, dissolve the salt in the water to make a brine.
  2. Cut up any or all of the 2 pounds of vegetables. Quarter the leafy bunches of vegetables, or cut them into 1-inch square pieces. Slice the cabbage core and include as much or as little as you like. Peel the root vegetables, and cut them into thin diagonal slices, 1 inch or so long. 
    Kimchi vegetables, ready to be brined
  3. Put the cut vegetables into the brine and mix, using clean hands. The brine makes the vegetables more malleable. Cover the bowl to keep it free of foreign objects. After 6 hours or so (or overnight), drain the vegetables thoroughly in a colander. Taste them. They should be salty, but not unpleasantly so. If they are unpleasantly salty, rinse them or soak them in fresh nonchlorinated water, taste them again, and repeat until you are satisfied. Set them aside. 
  4. Peel the garlic and the onions. Peel the ginger (the edge of a spoon works nicely).
  5. Blend the onions, garlic, and ginger in a food processor, adding enough water to allow them to blend. (Or mix them with a mortar and pestle, or chop them finely with a knife).
  6. Add the red pepper, sugar, and fish sauce, if using, to the combination from step 5, adding just enough water to keep things blending into a paste.  
  7. Making the red pepper paste
    (Photo courtesy of Sean Kushi)
  8. Cut the scallions diagonally into 1-inch lengths, add them to the paste, and mix the paste with a wooden spoon.
  9. Move the drained vegetables into a large bowl, and mix them with the seasoning paste using the spoon. Taste the kimchi. If it is not salty enough, add more salt now and stir. 
  10. Kimchi vegetables with the red pepper paste
  11. Pack the kimchi tightly into the Mason jars, leaving 1 inch of space at the top. Try to pack it down well enough to squeeze out most of the air bubbles along the side of the jar. Close the jar. 
  12. Leave the jar on the counter at room temperature for a few days. Taste it every day or two. It should start to taste a bit "wild." When you like the way it tastes, put it in a cool cellar or a refrigerator to store, or bury it in the ground. The cooler the temperature, the slower the subsequent fermentation.
My tips:
  • As a warning, kimchi is especially smelly as it ferments! You may want to ferment your kimchi in a cupboard if you have the space to.
  • The vegetables will shrink as they soak in the brine. I would not recommend adding more salt brine than what is listed in the recipe. Otherwise, the kimchi may turn out too salty.
  • Make the red pepper paste according to taste. For example, I do not like my red pepper paste too oniony, so I use less onion than called for in the recipe.
Enjoy kimchi with rice or noodles, or check out some of these kimchi serving suggestions from Serious Eats.

Happy fermenting!

Tastes of Summer Kimchi
Featuring vegetables from Waltham Fields Community Farm

Friday, October 11, 2013

Recipe: Pickled Celeriac

Ever since I first had celery root pickles at the restaurant Taberna de Haro, celeriac has become my new favorite pickle! I have made many batches of pickled celeriac since, as a cook at Taberna de Haro last year and at home.

-Pickled celery root and beets-
Pickling celeriac with beets gives it a nice purple color

Here I want to share with you my recipe to make celeriac refrigerator pickles, which was published in my town newspaper, the Lexington Minuteman, for the Lexington Farmers' Market. Celery root is in season right now, so it is the perfect time to make these pickles. There are a few more weeks left for the Lexington Farmers' Market for this season, or find celery root at another local farmers market near you.

Celery root

Celeriac to appear at the market
By Annabelle Ho
Published Thursday, September 12, 2013

Celeriac, also known as celery root, was one of my favorite vegetables to weed at the farm last summer, no joke. Celery root contains plenty of fiber, as well as vitamin B6, vitamin K, potassium, phosphorous, and more. Although celeriac may be unfamiliar, there are many ways to cook this versatile vegetable.  The leaves and stems of celeriac can be used just like celery.  Celeriac can be eaten raw and grated into salads, or fermented.  Celery root can also be cooked, such as in soup or roasted with other root vegetables. A celeriac puree is a great alternative to mashed potatoes. However, one of my favorite ways to prepare celeriac is to make celery root pickles. Celeriac is delicious pickled, although this pickling recipe can be used with other vegetables as well. Look for celeriac at the Lexington Farmers' Market to arrive fresh from the farms in a week or so. 

Celeriac Refrigerator Pickles

Ingredients:
1 medium celeriac (about 1 ¼ pounds)
1 teaspoon salt
½ cup sugar
1 cup distilled white vinegar
1 cup water
1 teaspoon whole black peppercorns
1 teaspoon whole coriander seeds
½ teaspoon whole allspice berries
2 bay leaves
2 whole cloves

Directions:
  1. Cut off the bottom and top of the celeriac. Peel the celery root and cut into thick matchsticks.
  2. Add all of the ingredients except for the celeriac in a pot. Bring the pickling brine to a boil.
  3. Add the celeriac and simmer it briefly for about 1 minute, according to taste. Do not simmer the celery root for too long, as it should still have some crunch.
  4. Take the pot off the heat and let cool to room temperature.
  5. Pour the vegetables and brine into glass jars. Cover the jars and refrigerate them.
  6. After 24 hours, eat and enjoy! The pickles can last for up to a few months in the fridge. 

Variations:
  • Pickle celeriac with purple beets to give it a purple color.
  • Use this pickling brine recipe with other vegetables, such as carrots, radishes, or turnips. Depending on which vegetables you use, how thin the vegetables are cut, and how crunchy you like your pickles, step 3 may be optional, and the raw vegetables can be added to the brine without being simmered.
  • Switch up the spices in the mix. For example, dill, cinnamon, and star anise are all good candidates.

Annabelle Ho is a Lexington resident with a Bachelor of Science in nutritional science from Boston University. She maintains a blog at herbalmedicinebox.com, and is a work share volunteer at Waltham Fields Community Farm. Annabelle writes for the Lexington Farmers' Market, and has been a volunteer at the market for several years. The Lexington Farmers' Market is located at the corners of Massachusetts Avenue and Fletcher in the center of Lexington, and is open rain or shine every Tuesday through October.

Monday, August 27, 2012

A Summer at Waltham Fields Community Farm

This summer, I worked on the weed crew at Waltham Fields Community Farm.


Founded in 1995, Waltham Fields Community Farm is a nonprofit organization "engaged in food production, hunger relief, and education." The farm consists of 11 acres, it supports a 500-share CSA, and it offers various other programs. Some of the produce grown at the farm this season included kale,

Kale. Harvest from the bottom up, and it continues to grow and produce new leaves!

swiss chard,

Swiss chard was everywhere

a variety of flowers, and much more.

 
 Fresh flower bouquet

I saw okra growing for the first time, too!

 Okra flower

The weed crew position was part-time, Mondays - Fridays from 8 am - noon, from June - August. The crew consisted of four members, and from Tuesday - Friday we worked with drop-in volunteers, from 9 am - noon. It was great to meet and to work with volunteers of different ages and backgrounds! Most of the work that we did was by hand, and we occasionally used hand-tools. The weeding we did ranged from detailed work such as weeding carrots, to weeding weeds that were taller than me (I am five feet tall).

One great benefit of the job was receiving fresh produce from the farm. I fermented both pickling and salad cucumbers using the recipe from the book Real Food Fermentation (a book that I contributed writing to), and both batches of fermented pickles came out very crispy. I had grape leaves on hand to add to the fermenting jars as well, which are supposed to help pickled cucumbers to keep their crunch.

Fermenting cucumber pickles

Other ways I preserved the harvest included making sauerkraut and a variety of pestos, freezing, and canning tomatoes with other members of the weed crew. To make the tomato sauce, we modified a recipe from Pick Your Own, took the appropriate precautions in order to avoid botulism, and with three people, six hours of work, and a water bath canning set, we had canned 10 pint jars of tomato sauce.


 Cantaloupe ice cream

Despite Waltham Fields Community Farm's abundance of tomatoes this year, this has been a tough tomato year for some farms in the area because of late blight. Late blight appears sporadically in the northeast, and unfortunately returned this season. Also known as "Phytophthora infestans," late blight caused the Irish Potato Famine in the 1840s, and it infects tomatoes and potatoes. If late blight is not managed, it can destroy entire crops in days. While some farms in the area lost crops due to late blight, others who have been able to manage the disease have had a very productive tomato season. Read more about late blight in this handout, and for photos and for more information, visit this webpage.

Another crop we weeded was parsnips, a crop that we needed to weed in long pants, long sleeves, and gloves! Why? Because parsnips contain furocoumarins, a photosensitive compound that can cause phytophotodermatitis. If the plant juice from parsnips gets on your skin and the skin gets exposed to sunlight, it can cause serious burns and blisters that can last even up to a year. Although many people are already familiar with these burns from wild parsnips, the burns can occur with cultivated parsnips, as well. Luckily we were warned about the dangers of parsnip beforehand! For more information and pictures regarding parsnips burns, check out these articles: "Burned by wild parsnip," "Parsnips gave me blisters! Gardener covered in sores after brushing against vegetable leaves," and Parsnip Dangers from Wikipedia.

Over the summer, I also attended several meetings with Emasscraft, the Eastern Massachusetts Collaborative Regional Alliance for Farmer Training. "CRAFT is a free, collaborative group...From April through October farmers, farm workers and apprentices from CRAFT farms gather at one farm for a visit and/or workshop. Each visit includes an overview of the farm as well as a discussion about one or two specific topics. CRAFT discussions are also scheduled November through March if there is sufficient interest" (http://emasscraft.org/wordpress).

I went to three CRAFT meetings this season. At the meetings, I learned about weed management techniques at Drumlin Farm, tomatoes at Wright-Locke Farm (a farm that I also wrote an article about for the Lexington Farmers' Market), and irrigation systems at Moraine Farm. I enjoyed visiting new farms, and seeing how each farm operates differently from one another. The schedule for Emasscraft meetings can be found here, and I would highly recommend signing up for their listserv.

It was a great summer working on the weed crew, and also with the wonderful staff at the farm.

Waltham Fields Community Farm Staff of 2012 (minus Marla)
(photo courtesy of Waltham Fields Community Farm)

Although I am sad to no longer be working at Waltham Fields Community Farm, I am looking forward to sharing a winter CSA with some of my fellow weed crew members this winter. Waltham Fields Community Farm's annual Waltham Farm Day is also coming up on Saturday, September 22! For more information about Waltham Fields Community Farm, visit their website.


Red sunflower

I am also excited for some new opportunities that are coming up. I will be participating in Goldthread Herb Farm and Apothecary's Farm to Pharmacy Intensive this September 22-28. This week I also begin working at Blue Heron Organic Farm in Lincoln, and in addition to my waitressing hours at the Spanish wine and tapas restaurant Taberna de Haro, I will be working as a cook. Stop by the farm or the restaurant sometime and say hello!

Friday, July 31, 2009

Get Your Ferment On - Fermented Veggies, Food Preservation, & Live Active Cultures!

Today's post is dedicated to the wonderful world of fermented veggies.

To start off, here are a few definitions to clear up some initial confusion:
  • Lacto fermentation- "using salt to suppress spoiling bacteria while fostering growth of beneficial lacto bacillus bacteria, which are present on vegetables and produce the preservative lactic acid." (1)
  • Pickling- "Using vinegar to preserve vegetables or fruits along with spices and herbs."
  • Hot water bath canning- "using a boiling pot of water to push air out of sealing-lid glass jars containing high acid foods." (1)
  • Pressure canning- "Using a pressurized canner to create even higher temperatures (steam) that pushes out air and seals the lid of glass jars containing low acid foods." (1)
  • Culturing- "Using microorganisms to transform the sugars or lactose of various liquid foods into other kinds of nutritious and tasty substances." (1)
Vegetables usually ferment best when using a brine, which is basically salt dissolved in water (2, pg. 38). In some vegetable ferments, such as sauerkraut (aka fermented cabbage), the salt draws water out the vegetables via osmosis (2, pg. 38). Meanwhile, in other vegetable ferments, such as cucumber pickles, a brine solution is mixed separately and then poured on the vegetables (2, pg 38). The salty environment prevents strains of several harmful and pathogenic bacteria from growing, while it encourages the growth of certain desired strains of bacteria- in particular, Lactobacilli (2, pg. 38-39).

In addition, the more salt you use (2, pg. 39):
  • The slower the fermentation process
  • The more acidic/sour the product
  • The longer the product will store for
Fermentation vessels include crocks or simply large, glass wide-mouth jars. A smaller glass jar can be placed inside a wide-mouth jar to put pressure and weight on the fermenting vegetables.

And fermenting vegetables can be as simple as this:
  • Make a brine by dissolving ~3 tbsp salt in 4 cups water (or to taste)
  • Put 1.5-2 lbs of cut up vegetables (for ex., cabbage, carrots, beans, squash, radish root vegetables, a combination, etc.) into crock(s) or jar(s). This can be done with or without the addition of spices or herbs (for ex., whole peppercorns, mustard seed, caraway, dill, etc.)
  • Pour the saltwater brine over the vegetables, making sure that the vegetables are submerged in the liquid.
  • Put a plate or weight on top of the vegetables to weigh the veggies down.
  • Put a cloth or towel over the container, and let sit at room temperature for 2-4 days (to taste)
  • When the vegetables are ready, store in the fridge

Helpful hints:

  • It is important to make sure that the vegetables remain submerged, because fermentation is an anaerobic (without oxygen) process. If there are vegetables above the liquid, they will be exposed to oxygen, and can encourage the growth of mold.
  • Try to remember to check on your fermented veggies everyday and make sure that they are submerged under the brine, and also taste them to see if they are ready for refrigeration. If there are any moldy veggies on top, you can just remove them (the mold only grows on the surface). And if there is water loss by evaporation, simply add more brine to your fermenting vegetables.
  • Fermentation occurs more quickly at higher temperatures.

By making your own fermented vegetables, (including sauerkraut, sour beets, kimchi, and more), you can control the saltiness and sourness/acidity of your fermented food!

In addition, there are many benefits of fermentation and from eating fermented foods:
  • Fermentation preserves nutrients, and "breaks them down into more easily digestible forms" (2, pg. 6)
  • Fermentation creates new nutrients, such as B vitamins (ie. folic acid, riboflavin niacin, thiamin, and biotin) (2, pg. 6)
  • Fermentation "removes toxins from foods" (2, pg. 7)
  • "Many fermented foods can be consumed live...and alive is the most nutritious way to eat them" (2, pg. 7)
  • "Many commercially available fermented foods are pasteurized," such as commercially sold yogurt in stores, "which means [that they are] heated to the point at which [beneficicial and nonbeneficial] microorganisms die." (2, pg. 8)
  • "Lactobacillus fermentation inhibits the growth of diarrhea-related bacteria such as Shigella, Salmonella, and E. coli." (2, pg. 8)
  • Fermentation is another way to preserve foods.
After you've done it once, you'll find that fermenting vegetables is actually very easy! Look at my sample recipe above or links to some recipes below.

For more information on fermentation from Sandor Ellix Katz, read his book Wild Fermentation, or take a look at his website for recipes on how to make sauerkraut, pickles, and more!

In addition, Gabriel Cousens from the Tree of Life Rejuvination Center provides a little information on fermented foods in his book Conscious Eating. Preview Conscious Eating here through Google Books, and go to page 743 to read the section on Fermented Vegetables and also to find a few recipes.

In his book, Gabriel Cousens notes:

  • "Sauerkrauts are fermented foods that help re-populate the colon with health-promoting, lactic acid-producing bacteria. Raw sauerkraut has these healthy bacteria, but store-bought, pasteurized sauerkraut does not." (3, pg. 743)

And although I already went through some definitions, I would like to reiterate that room temperature vegetable ferments are not the same as pickled vegetables made and stored in vinegar (when you put the vegetables directly in the fridge for preservation/to develop flavor). Although both are food preservation methods, vegetables fermented at room or warm temperatures for several days or weeks rely on the bacteria lactobacilli to create lactic acid. Thus, these fermented vegetables contain live active cultures. Read a little more info on this subject here.

If you would like some more reading on sauerkraut fermentation, look no further.

And on another note, the other day I was at the Russian grocery store Bazaar in Brookline, and I tried a pickled apple! I probably won't be getting one again, but it wasn't bad! (It was sweet and sour at the same time!)

Happy Friday everyone! :)

Sources:

  1. Ben Grosscup. "9-19-09: Date of Food Preservation Workshop Near You." NOFA - Massachusetts News - August-October 2009, p. 4.
  2. Katz, Sandor Ellix. Wild Fermentation. White River Junction, Vermont: Chelsea Green Publishing Company, 2003.
  3. Cousens, Gabriel. Conscious Eating. Berkeley, California: North Atlantic Books, 2000.